Project: Artistic Philos'phy
Overview
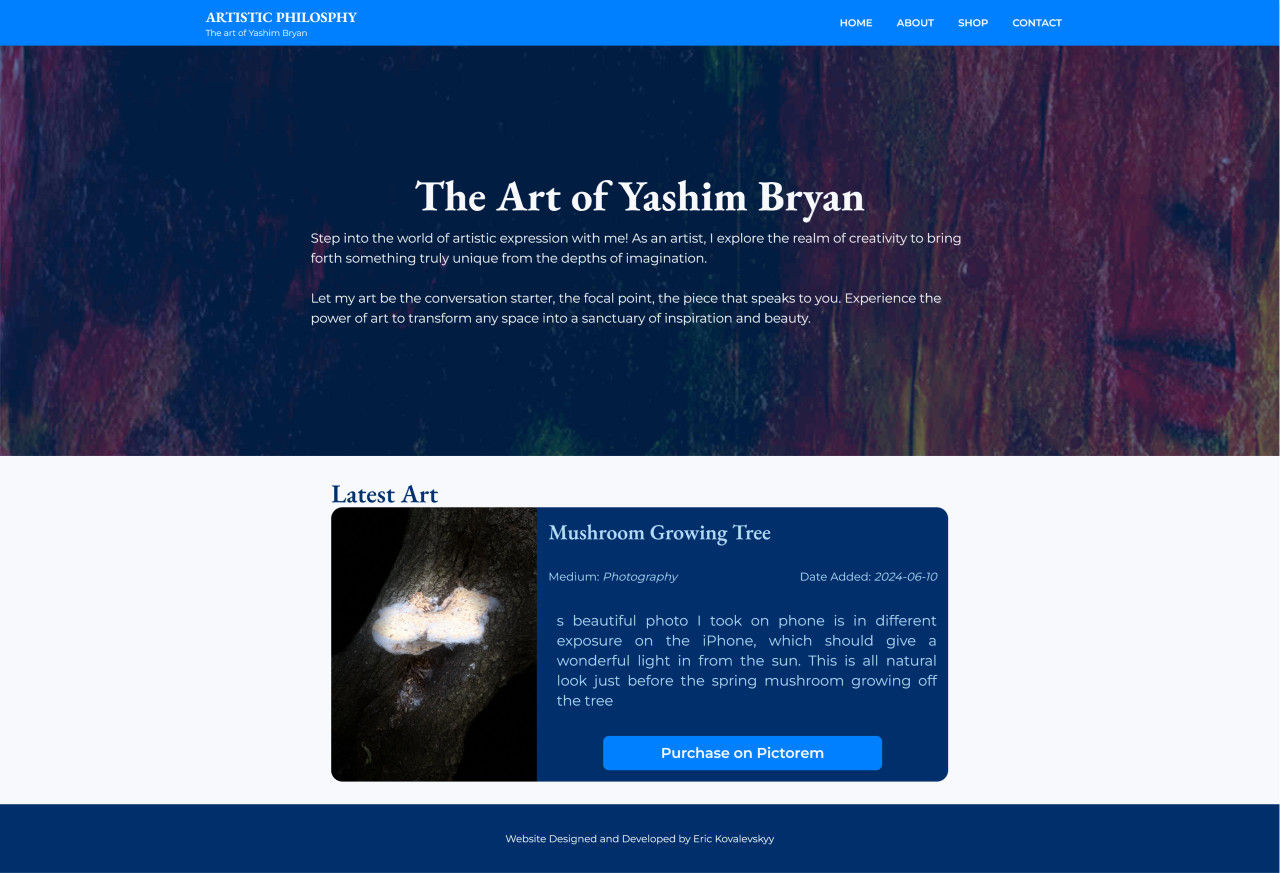
Artistic Philos'phy is a landing/portfolio website built to showcase the works of Yashim Bryan, a visual artist who works in a variety of media. It uses a typical landing page layout with a hero section, a featured product, an about page, a store page, and a contact page, all accessible via a navbar.

Yashim had a creator page on the Pictorem storefront, which is a service that allows artists to upload their works, which can then be ordered by customers as prints on canvas or other media. However, this gallery is not ideal as the main landing page for an artist, since it only allows the user to post a very brief bio with very little control as to the overall visual theme and layout. Yashim was interested in expanding his online presence as an artist, which meant having his own, dedicated website that would allow him to upload his newly created art to be available for purchase.
Building out his landing page was a fairly simple task, and something I had done for clients on numerous occasions. However, in order to give him the control of his content, I would also build a backdoor portal where he'd be able to add, edit, and delete his products. I also used this as an opportunity to expand my knowledge and experience with the tech stack which I had relatively recently been acquainted with.
Tech Stack
- Next.js
- Tailwind CSS
- DaisyUI
- PostgreSQL
- imagekit.io
- Axios
- Resend
- Vercel
By the time I started this project, I had already been working with Next.js for several months, on a variety of projects with other team members. I was relatively familiar with the framework, but at the same time, a lot of my knowledge and skills at the time were limited to my immediate duties, which mainly lay in the front-end. This project was my opportunity to become more acquainted with Next.js as a back-end server, and to get more comfortable with its server-side rendering capabilities and best practices. With that as my primary focus, I went with Tailwind CSS, which I was already familiar and comfortable with, and utilized the DaisyUI library to make styling components quicker and easier on the front end.
Since my client needed to upload large image files, he needed a storage solution that would allow him a lot of storage space at minimal cost. For me personally, it was also important that this storage solution had a robust API. After doing some research, I discovered imagekit.io, an image and video storage service that had a free tier, and offered all the features I could possibly want.
In order to be able to sell his artworks, my client needed a storefront of sorts. Unfortunately, simply creating a shopify page was not an option: While my client's goal was to sell his art, the responsibility of printing and mailing out the physical artworks were beyond his means, and this still needed to be delegated to an outside service. Since he already had a gallery on Pictorem, I looked into whether they had an API through which I could access their products. While they did, the use of this API was fairly complex and the documentation wasn't particularly detailed. However, they had another option: A dynamic URL which would take a provided image and generate a product page with that image. This was the solution we went with, at least for the time being.
I had some experience in the past, implementing contact forms, primarily using front-end services such as EmailJS. However, a lot of these services are often designed for sending emails out to clients, such as newsletters or registration confirmations. This was too robust for my needs. The purpose of the contact form is to send an email to the website's owner (my client), in case someone wanted to reach him with regards to purchasing art originals, or a possible gallery installation. Resend was the best service I could find, with a free tier, which had, both, the robust customizability, and simplicity of use that I was looking for. With it, I was able to link the account directly to the domain name and allow for my client to receive emails from his website directly into his personal Gmail account.
Finally, I needed to provide my client with a hosting solution. After exploring a number of possible solutions, including Google Firebase, I decided that Vercel was ideal for the scope of this particular website, and the simplicity of integrating it with GitHub. This was my first time actually deploying a project on Vercel, and I found their infrastructure to be excellent for my purposes.
Design and Planning
As a public-facing website, this project may not look particularly fancy or extravagant. My goal was to make it look professional, and visually similar to some other websites that my client showed me as references. With UX/UI design not being my primary specialty, I kept it simple, with a cohesive colour scheme based around Azure Blue, as per my client's request.
Outside of the custom colour scheme, I relied on DaisyUI and its default styles to dictate the aesthetic. The layout was mainly decided on the spot as I started coding the components. DaisyUI and Tailwind made the iterative process simple enough that if I didn't like something, it was easy to experiment with the arrangement of the elements. I ensured that the website was responsive and looked presentable on mobile devices, and that the colour theme had enough contrast to meet accessibility standards.
Spotlight
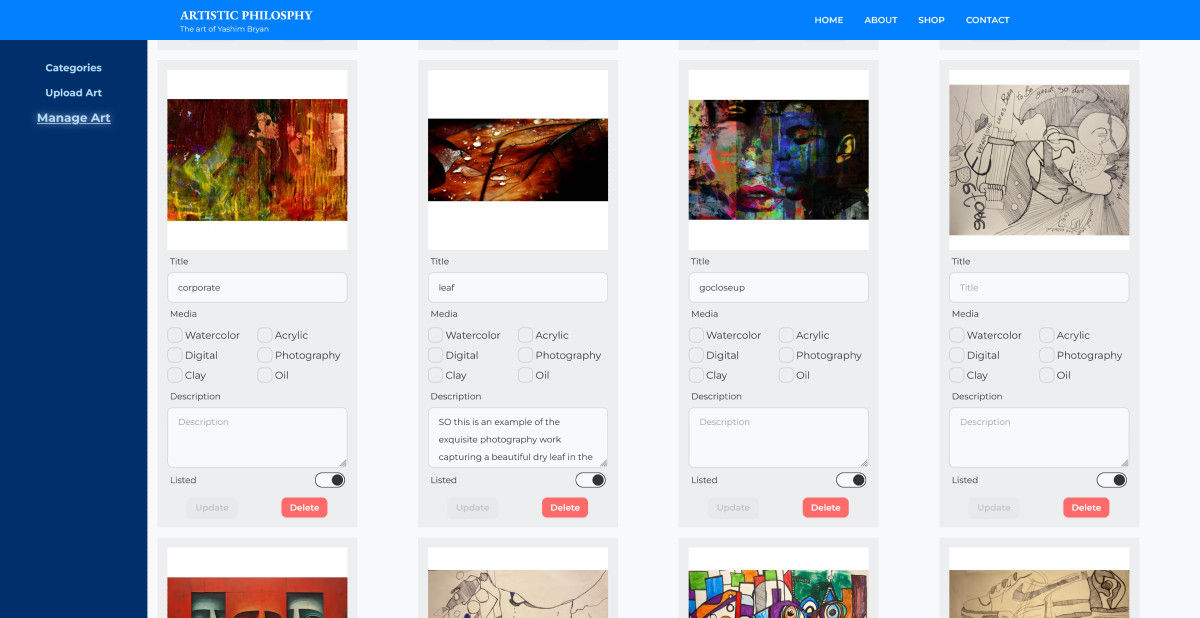
The key feature of this project was really the admin portal on the backend. Since my client was working with a limited budget, I needed to work efficiently, so my goal was to keep it simple, secure, and stable. The backend portal requires a login, which only Yash and myself have access to. It leads to a simple interface which allows us to upload a new image to imagekit, whose unique identifier gets stored as a new product on the PostgreSQL database. At that point, we can add a title and description to it, and also to toggle whether it will be active. Inactive images don't get displayed on the public-facing page. This was my initial MVP, but later on, I also added a list of media for each product that categorized all the works on the client-facing shop page.
The way that this all worked together took a lot of consideration. Since I was dealing with two separate storage sources (one for the images and one for the database), it required a multi-step process. Imagekit had a number of ways to upload, but the simplest one was their own React-based component which uploads an image to their servers and returns that image's metadata. I would then pass this metadata into my own API, where its unique ID would get uploaded to my database.

Following these patterns, I also added the edit and delete functions for the products, and a section for adding and deleting new types of media.
Challenges
When trying to decide on a hosting service, I explored several options. I was mainly familiar with traditional hosting services, which would host static HTML pages. These are not ideal for full-stack web-apps, so my initial thought was to use Google Firebase, as an all-in-one solution for hosting, database, and file storage. However, this , and had a chance to try out Google's Firebase, which seemed like the ideal all in one solution for hosting and online storage. However, upon experimenting with it, I realized that it was not a viable solution for file storage. In my case, what I needed was a service that would store high-resolution images which could be easily embedded on a website, and also passed along in a dynamic URL to be used by Pictorem for generating the store page on the fly. Google would not allow for this, because of security restrictions and the fact that it's not designed to be used as an image storage.
It was at this point that I discovered imagekit.io for my image storage needs, and with it, decided to steer away from Google and to a simpler deployment solution via Vercel, which, aside from image storage, offered everything else I needed, including a PostgreSQL database and free web hosting for smaller websites. In the end, I feel this was the best possible solution given the scope of my project.
My Learning Journey
When I undertook this project, I set out to become more adept with the full-stack capabilities of Next.js. Because of the admin panel and the product management interface, I was able to get plenty of opportunity using API calls and performing basic CRUD functionality on the backend.
However, through this project, I was also able to learn quite a few Next.js best practices that I wasn't familiar with, such as the Suspense component which allows for rendering of a page while certain back-end rendered components are still being loaded. This also caused me to look more deeply into server-side rendering in Next.js overall, which was what this framework was ideally designed for to begin with. I was able to take this knowledge and bring it into my other work, where I helped to optimize the app I was working on with another team.
Upcoming Features
While the website is deployed and live, there are a number of features I'd still like to implement in the future. The main one being more content. I want to allow my client to let visitors know if he has upcoming events where his art will be featured, which will involve creating a News or Events page, and also ensuring to feature anything upcoming on the front page. And, of course, with this, I will have to create the interface to allow him to create these news postings.
Additionally, I'm not entirely happy with using a simple dynamic URL to redirect users to Pictorem to generate a store page. This method, although recommended by Pictorem, relies on their website to generate the store page, which not only takes a few seconds, during which it's just a blank, white screen, but directs users away from my client's webpage. My goal is to explore Pictorem's in-depth API in greater detail to see if I can use it to develop a proper store page that handles the transactions via our own domain.